Tuesday, July 21, 2009

My Culture Quest


My Culture Quest is a fun, interactive site which explores different cultures and countries. You choose a character and then start travelling the world visiting museums and galleries. Each place visited offers information about an artwork or cultural item. Students need to read the information and then answer a multiple choice question correctly in order to collect the item and create their own exhibition.


Once in the game, a world map is provided with highlighted points. Click on the point to travel to the destination. Your character will travel via air balloon.


You are given 12 days to collect as many items as you can. You probably won’t get all the items in this time allowing students to play the game several times without being bored as they explore new places.


One drawback however, there is no point to visit in Australia!


This site provides a great way for students to learn about art, history, countries, cultures, religion and maps. It also encourages the development of comprehension and reading skills. The site allows you to download flash cards with quiz questions to help students remember the information. These cards could also be used for further activities.

Students could do the following activities:
· find the countries using google maps
· find famous landmarks from the country
· research the flag
· write a travel journal of their journeys and document the items they collect.
· make a passport documenting places of their travels
· research countries visited
· research art items and art techniques mentioned.
· make a quiz or board game based on collecting items as you answer questions correctly.

Online Comic Creators

3 Fun Games to use in the Classroom

Tap into the world of comics

Online Tools to Research, Organise and Process Information

Build Your Wild Self


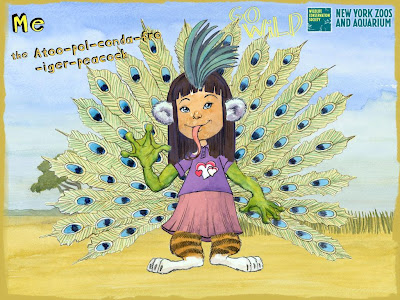
Build Your Wild Self is a fun and creative site where you can create a character by choosing human parts and then combine them with animal parts. The site provides lovely hand drawn and watercoloured images. Simply click on the body part you want to create and choose the image you want. There are also options to change colours. There are limited options for clothes though.


Once finished creating, you can print out the design or email it to a friend or yourself. It is sent as a .gif file allowing you to save it.

This site could be used in many ways across different year levels. Students could make an image of themselves first without any body parts and then add their favourite animal parts. The printed image even comes with a name made up from all the animals. Students could describe the image or create a story about the character.

Each member of the class could make a character and print it out to put up around the room. This site could be used with any animal unit.

It could be used as a starting point for an artwork and is also useful for creating an avatar.

Here is an example of a character without animal parts.


Here is an example after animal parts are added.


Friday, July 10, 2009

Tools to use at the beginning of a school year


It is important for a teacher to know their students in order to best cater to their strengths and needs and to provide a positive learning environment. This can be done by using digital tools such as:

1. Talking Avatars


Students can introduce themselves using a talking avatar. You might set out specific questions you would like answered in this task.


2. Visual Communication


Using avatar design sites, students create an avatar which resembles them and contains visual images which represents something about them. Eg. Holding a guitar – likes music.


· Students could write about their avatar and explain the meaning of the visual images
· Set up a guessing game and see if the class can guess who is who.
· Print out the avatars and distribute them and ask students to find the person who belongs to the avatar and interview them - ice breaking exercise.
· Display the avatar images around the room


Sites to use are:


Using the wordle site, produce a word cloud made up of words which represents them. Go to this link for more information.


Produce a ‘About Me’ world in the Shidonni site. Go to this link to see more.


5. Personal Profile


Students can produce a personal profile using an eportfolio which is password protected.


Create a personal profile using a presentation or virtual book.


Wobook

6. Time Line


Students can create a virtual time line of their life documenting events with text and images.


Dipity

7. Online Survey


Identify prior knowledge and interest by creating an online survey for your students.


Questionform


8. Determine students’ strengths and learning styles

It is important to know your students' strengths and weaknesses. It is also important that students know their own strengths and weaknesses. The following a tests which evaluate these.


Saturday, July 04, 2009

Epals

http://www.epals.com/

Epals is a great website which allows you to make connections with classrooms around the world. It is a free service where you can create accounts for teachers and students. It is managed by teachers and administrators. All interactions are policy managed by school districts and teachers, including emails, blogs, and forums, and can be monitored and filtered according to any standard.

What I like about it is that students' emails go to the teacher first for approval which makes it possible to filter and monitor communications. The site offers many different projects including a schoolblog.

Students are motivated to write emails as their desire to communicate is increased. Their literacy skills are improved as they plan and edit their emails before they send them. The use of proper sentences and no abbreviations are emphasised.

The site offers collaborative projects you can particpate in your you can liaise with a teacher of a class and create your own project or simply use it as a form of communication.

By connecting with a class in another country, many other activities can follow such as looking at Google Maps and finding the school. Looking at the culture and language of the other country.

Make a Super Hero


Heromachine allows you to design a superhero or villain. This site can be used in many ways. Students can create a character and use it in a story, draw the character, create their own comic, design a poster using the character, use the character in an animation or game. You will need to do a screen shot of the final design.


Another option to create a superhero is the Marvel site


Creature Creator


This is an application found on the Mr Magorium's Wonder Emporium site (from the movie). The site allows you to design your own toy. I like to use it to design creatures.


There are several body types to choose from and parts can be flipped, rotated and the colours can be altered.

I have used this site with Year 8 art students where they created a creature using the site and then used the design to create an artwork. It is great for students who are not confident with their drawing skills but love to create.


Graffiti Creator

http://www.graffiticreator.net/

This site allows you to design Graffiti style writing. You have many options and colours to choose from.


This may be used as a design activity, using text as art or students can design their name and use it in a painting or drawing exercise. You may also like to look at the use of colour schemes, eg. warm and cool colours, etc.


Pivot Stick Figure Animator

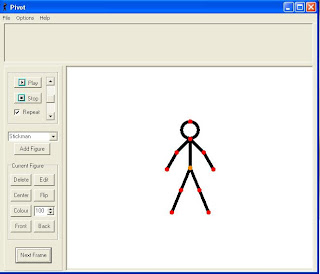
Pivot Stickfigure Animator is a fun and easy way to produce an animation. You could use it as a task, introduction into animation, telling a story or to develop design and ICT skills. This is a great program that is free to download.


You can create an animation using a stickfigure or other characters. It can be as simple and as complex as you want it. It can be used from primary school students through to high school.


First I ask students to design a background using a drawing software, usually MSPaint (but any will do). It helps the creation of the animation if the background contains elements which the figures can interact with. eg. Hurdles to jump, diving board. It is also possible to use digital images as backgrounds.


The animation is quite simple to make, simply move the figure using the red points and then click on next frame button. Continue until the animation is finished. There is also the option to add items into the animation which can also move. eg. a ball. The final animation can be saved it as a Gif file. This can then be downloaded into Windows Movie Maker and students can add a title, credits and music or add it to a power point presentation.


I like to choose a theme and make certain specifications, such as, no violence and no one can get hurt.


I found ‘Olympic Sports’ was a great theme to use giving students many ideas to choose from.
You can download the program from http://www.snapfiles.com/GeT/sTiCkFiGuRe.html

Shidonni

Shidonni is a great site which I have been using at home and in the classroom. It is fun, engaging and allows students to be creative. The site provides online drawing tools for the participant to create their own animated characters, the world in which they live and the food they eat. These drawing tools are increased as the student participates in games and complete challenges.

It also allows students to send pictures and messages to friends they have added, send a character around the world and create an online book using their own characters they have created.

The site offers a free option and a Shidonni Pro option. The free option does have limits. Students can create up to three worlds.

I ask students to produce a Screencast of their world which they can save and share with others. A Sreencast is a video capture of the desktop. This also allows me to assess their work. The site I have been using for this is Screen-o-matic. It is easy to use and does not require download or installation.

There are many applications for Shidonni in the classroom. The site also provides resources for teachers. I have outlined a few suggestions for using Shidonni in the classroom.

WORLDS:

Their Own World

Students design a world which is about them. It could be set in their favourite place, or looking at their house. It can include drawings of themselves, family members, friends and pets. Students can fill the fridge up with their favourite food. The teacher could create a world for students from the class. Students can send a picture of themselves to the teacher creating a world with all the students represented. Students could also share pictures of themselves to each other in the class. This is a great task for the beginning of the school year to get to know your students.

Subjects: Art, SOSE.

Countries

Students can design a world based on a country. You may be working on a country or culture in class or allow students to choose their own. This task could accompany a research assignment. The task could ask students to draw a flagpole and draw the flag of the country. Draw a famous landmark from the country; also include housing and plant life which are relevant. Depending on the task students could then include people in appropriate dress and animals native to the country. The fridge could also be full of food native to the county as well.

Subjects: Art, LOTE, SOSE, Geography

Underwater

Set a task which focuses on marine life. You might provide a list of specific creatures for students to create or each student could be given a sea creature to draw and then send it to their classmates so they all have a collection. As students create their own creature they can research information about it such as the environment it lives in, its life cycle and food it eats.

Subjects: Art, Science, Marine Studies, SOSE

Back in Time

Set a task where students create a world based on a period of time in history. Again this could coincide with a research assignment or unit of work. You may focus on one period of time or students could choose their own. The world can include buildings relevant to the era and people wearing the relevant clothes.
Here are some suggestions:
Ancient Rome
Ancient Greece
Ancient Egypt
Stone Age
Medieval
Dinosaurs
Shakespearean time

Subjects: Art, History, SOSE, English

Future World
You could set the task for students to imagine the world in which they live in the future. You could pose the following questions:

What will we live in?
What will we be wearing?
Will there be animals?
What food will we be eating?
What has happened to the environment?

Subjects: Art, Science, SOSE, English

Out of Space

Students could create images of our galaxy, planet or make up their own. They might imagine life on a different planet. What does life look like on this planet? Students can include space ships and rockets.

Subject: Art, Science.

Living Environments

You can set a task where students explore a living environment, such as dessert, rainforest, bushland, beach or swamp. Look at landform, plant life, animal life within these environments.

Subjects: Art, Science

Fantasy World

This world is limited by the students’ imagination. Creatures may include robots, monsters, alien life forms or dragons.

Subject: Art

PASSPORT:

Ask students to send one of their characters away using the passport feature. Students can do a screencapture of the passport. The site will indicate countries the character has visited. This could lead into a research assignment.

BOOK:

The book feature could be incorporated into any of the above tasks. It could be used to create a story using the theme and characters of the world or it could be used as an assignment or reference book.

Moshi Monsters

There are many virtual pet games available at the moment. The trick is finding a game which students regard as fun, engaging, has great graphics and is challenging. One such site is Moshi Monsters.
Moshi Monsters is a Web 2.0 site where students register and adopt a monster. The site is monitored and is promoted as fun, safe and educational. It is a social networking site which also incorporates elements of a Virtual World. There are several components to this site which make it a viable educational activity. Participants must follow safety guidelines and learn how to interact in a virtual world safely. The graphics are excellent with interesting monsters. They cater for both girls and boys.


Social Network

Students can make friends with other monsters and send messages. This encourages students to use online communication tools and improve their ICT skills and learn how to do it responsibly.

Currency

Students earn currency which is called ‘Rox’. They can earn this currency by completing educational puzzles which test general knowledge, maths, spelling and literacy. With this currency participants can visit virtual shops and buy items for their monster’s house or food for their monster or clothing items.

Reward

As students increase their participation they can work through levels and are awarded a virtual trophy for each level and are given a set of shelves to display them on. This reward system provides a motivational tool and boosts their confidence as they achieve the levels. Pet Monster Students feel ownership over their monster. They can feed them, dress them and design their living environment. Students choose their type of monster, colours and its name.

Follow up Activities

This site leads to many potential activities.

Such as:

* Website analysis

* Website comparison using graphic organisers

* Design their own monster

* Make a stop motion animation using a 2D cut out of a monster

* Document the monster's progress by taking screen captures.

* Create 3D versions of monsters using clay, papier mache or even a soft sculpture with material and stuffing.

* Use as a tool to look at economics and document purchases made at the virtual shops.

* Focus on internet safety and how to use online communication responsibly.

Graphic Organisers

Graphic organisers are visual forms that encourage students to:
* explore topics
* analyse both the whole and parts of a problem or issue
* compare and contrast
* processes information
* assists in deconstructing information
* increase understanding
* organise their information, ideas and research in a visual form
* plan investigations
* review and reflect on knowledge and skills
* engage in higher order thinking

There are many graphic organisers available online.


Exploratree allows you to create and customise your own graphic organisers. They can be printed out as worksheets or students can create an account and access organizers you have created and fill them out online. It also free.


More Graphic Organisers

There are also printable graphics organisers available at
Education Oasis and Education Place

Going Beyond a Text Document

Using digital tools in education can add fun and creativity to a task and help to engage students in learning. An example of this is using different digital tools and media for a task instead of a typed text document.

Here are a few ideas which could be applied to any subject area or assessment piece such as a review, self-evaluation, analysis, interview, study or report. You may choose one to focus on or give students a few to choose from depending on their strengths and learning styles.

Avatar Video:

Using a webcam and avatar software. I use Logitech Quickcam Vision Pro. The software calibrates with the face of the person sitting in front of the camera and the avatar imitates the person’s movements. The camera has a built in microphone which allows the student to record their voice. The video is recorded with the final result looking like the avatar is speaking. This is also a useful alternative to oral presentations for students who are nervous of standing in front of the class. The video can also be added to a power point presentation.

Talking Picture:

Using a site called MashFace. You can combine your voice and with a picture to look like the picture is talking. This could be a great task for a portrait task where students could find a painting of a portrait and do an analysis of the painting. Alternatively, students could choose an identity depending on the task, such as a musician, sportsperson, actor, famous person from history, etc.

Avatars with text:

Another alternative is to use an avatar again but instead use written text and a generated voice.

Voki - This site allows you to choose an avatar , type in text and voice is generated. The site provides script to allow you to embed it into a Virtual Classroom, blog or website.

Xtranormal - This site also allows you to choose an avatar, however, you can include more than one character. Therefore, the task could be to create an interview. The voices are also generated from text. You can also include movement of the figures.


Comic Strip:

Students can write their review in the form of a comic strip with characters. They could set it up as an interview with one character asking the other character questions about the work or it may be one character giving the information. The characters are provided students simply drag and drop content into their comic strip. Once the comic is created students can save a screen capture of it.

Some sites to use are :
Bitstrips
Pixton
Super Action Comic Maker
Make Beliefs Comix
Myths and Legends Story Creator 2
Go Animate Toondoo
Creaza

Animated Movie:

You can create an animated movie using characters and text or voice recordings. These sites provide backgrounds and characters. You simple drag and drop.

Kerpoof - Movie option
Dfilm
Creaza
Moviestorm


Make a Storybook

Create a virtual story book by typing in text and adding backgrounds and characters.

Kerpoof - Story Option
My Story Maker

Make an Ebook

Make an EBook which is a virtual book which allows you to turn the pages and add all your own content.

Myebook – create an Ebook by adding photos, images, audio and video or convert PDF files

Wobook – convert files such as PDF, Word or Power Point into a virtual book.

Voice with a presentation

Produce a presentation to include text or a voice recording.

Voice Thread
280 Slides
Empressr
Animoto

Make a Photostory

Using Photostory , create a presentation combining images with music and a voice recording.

Wordle


Wordle is a fun way to play with words and design. The site shows the frequency of words used in text and arranges them in a layout of your choice. This is called a Word Cloud. The larger the word the more it has been repeated in the text. Wordle allows you to apply design techniques such as layout, colour schemes and fonts.

You can copy and paste text straight into the site or type in your own words, however, it is wise to plan first in a word document and then copy and paste. When the word cloud has been created students can produce a screen capture and paste into an image editor, document or power point.

Wordle can be used in many ways in education.


Here are some ideas:

1. About Me:

Learn more about your students by asking them to create a word cloud containing information about their likes, hobbies, interests, favourite shows, movies, music, food, friends, family and personality traits.


2. Classmates:

Create a poster with the names of the students in your class.


3. Subject poster:

Create a poster to advertise your subject or outline aspects of your class. Create your own or copy text from a syllabus or work program.


4. Glossary of terms:

Paste in a glossary of terms related to a topic or subject or generate a glossary of terms.


5. Text analysis:

Analyse the use of words in different texts by copying and pasting into the wordle site. Text may come from an article, poem, novel, play, document or website.


6. Classroom Rules:

Adapt classroom rules to look interesting and focus on the important words.


7. Analyse an artwork:

Students can paste the text they have created about an artwork or paste in an art review found on a website and investigate repeated words and their meanings.


8. Compare texts:

Compare different texts by creating word clouds and investigate the use of different words.


9. Brainstorm a topic:

Students can brainstorm a topic by generating as many related words as they can. It is a useful tool to introduce a new unit.


10. Character Traits:

Generate words related to a character in a book, game, television show, movie or play.


11. Text in Art:

Students can explore the use of text in art by using the wordle format and draw their own word cloud focusing on elements and principles or design. The wordle design can also be adapted to printmaking activities such as screen printing or lino printing.


12. Thesaurus:

Choose a word and then explore and include words of similar meaning.


13. Languages other than English:

Use the site to allow students to generate words in another language or how to say a word or phrase in different languages, such as Hello.


14. Design Elements:

Use as a task to learn design elements focusing on contrasting colours, appropriate colour schemes, effective layout, the importance of background colour and the use of fonts.


15. Song Lyrics:

Paste in the lyrics from a song


16. Own work:

Students can paste in any text of their own such as essays and assignments to reveal words which are important or used too often.