Friday, September 04, 2015

Exploring photo-a-day apps


One of my favourite things to do is to look at apps and find ways they can be used in the classroom which could possibly go beyond what they were originally designed for.

There are many apps which allow you to take a photo a day and have it display as a calendar.  The apps often provide the ability to add details to the image. These apps can have many uses in the classroom.

·        Document change: students can make observations of change by taking a photo each day of the month to compare with other days such as clouds in the sky, plants growing, construction of a garden or building, etc.

·        Personal reflection: Students can take selfies and do personal reflections each day, this will also document of they change during the year.

·        Reading log: Students can take a photo of the cover of the book they are reading and type the page numbers read and include comments.

·        Record student work: Students can take an image of work they have done each day and type in reflections.

·        Document a process: if students are working on a unit of work, students can document events through the duration.

·        Learning goals: students can set learning goals and take images to reflect and track their goals.

·        Art record: This is a great way to encourage art students to draw each day to improve their drawing skills.

·        Spelling words: Students can display their spelling words and take an image of a different word each day, they can then type in the definition of the word.

·        Themes and concepts: Students could take photos of using a particular theme or concept each month, eg. Shapes, colours, angles, etc.

·        Camp diary: students can take images during a camp.

·        Travel diary: images can be taken of different destinations. Could incorporate maps or apps such as Photo Mapo - Add a map to your photo.

·        Gratitude journal: Students can reflect each day of what they are grateful for.

·        Daily challenge: Each day students can be given a word or theme for a photo each day.
 

Some apps to choose from:


Android:


Friday, June 05, 2015

5 tools to create virtual posters


A Virtual poster is a digital page where you can often display text, audio, video, images, and hyperlinks. It is a great platform for students to present their work in a creative way. Collage makers can also be used to create virtual posters.

The posters created using the app options can also be shared by adding to an eBook using Book creator app.


Pic Collage available for iPad, Android and Kindle Fire.
Pic Collage for Kids available for iPad.
These are great free tools to create interesting posters and collages using your photos, stickers, frames, and text. There is the option of using collage templates or free form design. Pic collage allows you to search for images on the internet and add straight to the page. Pic Collage fo Kids- the best and safest visual and photo editor for home and schools! has removed social features making it safer to use with younger students.


2. Moldiv

Available iPad and android

This is a great tool for create collages by combining and editing multiple photos. It also provides templates.  

 
3. Canva

Available for iPad and web.

Require a registering for an account. Provide a range of templates and upload your own images and have a choice of free content or content to purchase.


Website where the teacher registers and can create student accounts. You can add images, videos, links and text. It also provides a library of images.


Is a free software which is available for Windows and Mac. The software provides a page layout option where you can add your own images, graphics and speech bubbles.


Story prompts with colour image search

I am always looking for useful image search tools. TinEye Labs provides a colour search function which searches Flickr images. You can select up to 5 colours and alter the percentage of colour by dragging the coloumns. You can also add keywords as tags to refine the search. When you click on an individual image it gives you information about the image.


There are many ways to use this website:
 
  • generate story prompts
  • brainstorm ideas for themes
  • look at colour theory eg. complimentary colours, warm and cool colours
  • colour symbolism
  • fractions and percentages
  • useful for design purposes when working within a colour scheme.
 
The site also offers a tool to help you identify the colours from an image.

Friday, May 15, 2015

4 easy to use image overlay tools to create illusions


The technique of layering images, masking and erasing, makes it possible to manipulate images to create illusions. This can often be done using two images - a background image and a foreground image. Parts of the foreground image are erased to reveal the background image.
There are many ways this technique can be used with students:
Such as:


·        Virtual trip: change the background image to anywhere in the world, create a travel journal or travel postcards.


·        Mythical creature: merge animal parts to create a new creature with powers.


·        Superpowers: create the illusion of super human strength, invisibility or the ability to fly.


·        Surrealism: create a surrealistic image by placing objects out of context.


·        Out of proportion: Create the illusion that something has grown or shrunk by placing it next to objects which are out of proportion.


·        Space exploration: use images of space and planets for the background.


·        Travel through time: use images from the past as a background and add a black and white or sepia filter, students could also dress in relevant costume.


·        Jump into a story: use images reflect from a story.


·        Be the star of a comic: add images to a comic creator


·        Clone yourself: ever wished you could be in two places at once, take multiple photos of yourself in different poses and add them to the same background image.


·        Mirror image: create the illusion of a mirror image.


·        Evil twin: take on two personas in the same image.

There are many software options which allow you to do this technique, however, there are now many easy to use options.

1. Superimpose

Available for iPad and Android

Provides the ability to layer and mask your own images.

2. Clone camera
Android version: Clone camera 2.0
This app provides the ability to merge images and overlay.

iPad version
This app provides a range of free images for the background. You can buy the upgrade which will provide more images. You can use your own image for the foreground image. Very easy to use, simply erase the background of the foreground image. The free version does have ads.
4. Microsoft PowerPoint
Thought it was worth mentioning the remove background function in PowerPoint which is very effective and easy to use.
In the picture tools, select the option Remove background. Tools will then appear to indicating mark areas to keep and mark areas to remove. A purple mask will appear over the image, the purple areas will be removed. Layer images by right clicking and selecting Bring to front or send to back.

Sunday, February 23, 2014

Create eBooks on iPads

Creating eBooks is now easier than ever using iPads and the Book Creator for iPad app. Students can create the content to add to their ebook using a variety of apps. These can then be added to Book creator for a range of purposes. Book creator will allow you to add images, videos, audio and record audio. The ebooks can be exported to iBooks, iTunes and exported as an epub file.

Ways to use ebooks 

• Instructional manual: take photographs of a process or experiment, video demonstration 
• Reference book: Maths equations and tutorials 
• Recipe book
• ‘About me’ book
• Learning another language
• Learning the alphabet
• Picture book
• Glossary to develop vocabulary
• Spelling List book
• Present class artwork
• Photo book
• Art portfolio
• Create a year book for the class
• Reflect on a field trip or school camp – apps to edit photos, create comics and collages
• Present a research task
• Use as a digital portfolio adding images, collages, comics, videos, audio and text
• Create a comic book
• Write a story
• Diary or journal
• Demonstrate understanding of a topic by explaining diagrams or images
• Present Poetry
• A music book, add recorded videos or audio of students creating music
• Use for planning a project and recording end results

Apps to create videos and images to add to your eBook: 

Concept maps:


Video apps:


Image editing apps:


Word Art: 


Sunday, August 25, 2013

4 Apps to Create Designs with Words

Creating designs with words can be a great way to reinforce spelling , learning of new words and describing a theme or topics.  Students can create their own designs and use them to decorate the classroom. here are 4 great apps which allow you to design using words in different ways.


Create a collage of words and customise text, colour and layout.


This app allows you to draw a line or choose a created line and the add text to the line.


Type the text you wish to use and customise font, size and colour and then draw on the device and the words appear.


With this app you can take a photo or use one from the gallery, type in a set of words and the app will apply the words to the image. There are a few styles to choose from and colour schemes.  The effects look great.


Saturday, August 24, 2013

Learning Game Coding

Learning the basics of computer programming can be a useful skill. There are many apps and software designed to be user friendly for students of varying ages, to learn how to code using visual interpretation with drag and drop functionality. There are also games which involve giving instructions and using commands. These processes can help develop skills in sequencing, literacy and numeracy, problem-solving, creativity, and communication.
 
Apps:
Cargo-bot - a fun game where students learn about sequencing and instructions, also good for developing memory skills.
Hopscotch - provides a visual drag and drop platform with colour coding.

Daisy the dinosaur -  This free app offers an easy drag and drop platform to move Daisy the Dinosaur.


Kodable - a game to learn programming concepts and problem solving.
Move the Turtle. Programming for kids - a fun way for younger students to learn the basics computer programming and using commands.
Bee-Bot  - provides a tool for younger students to learn directional language and programming through sequences.
Bee-Bot Pyramid - provides challenges for students to solve.


Software:
Scratch
 
Web Based:
 
Gamestar Mechanic - a game which allows students to learn about game design and make their own games.

Creating Video Tutorials for a Flipped classroom

 
A Flipped Classroom is a teaching model which reverses traditional methods.  Instruction is delivered at home through interactive websites, teacher-created videos or content and moves the homework style learning to the classroom.

Class time is used for creating tasks, exercises and problem solving while the teacher is present to assist and give immediate feedback whereas the homework is designated for learning content and students can form questions about what they have learnt to prepare for their next lesson. This allows the teacher more time to interact with the students.
 
Some teachers like to create informative videos or ask students to create the videos for younger students. These can be made using screencasting software and some apps, such as:

Apps:

These apps allow you to record your drawing and narrate at the same time.  Enabling you to explain a concept or give instructions.  Also great for students to demonstrate their understanding of a concept.  You can also upload images and diagrams in many of these apps.

Sago Mini Doodlecast

Explain Everything ™

ShowMe Interactive Whiteboard

Educreations Interactive Whiteboard

Doceri

This app allows you to record websites.

Explain a Website

Web based:

The best one I have come across is Screencast-o-matic which allows you to record your desktop and select the file type you would like to save it as and then save to your computer.

Software:

Microsoft PowerPoint - you can create some great tutorials with PowerPoint using the animation and record slide show tools.  It also allows you to convert into a video and record narrations.

Microsoft Community Clips -  this free software is an easy to use screencasting tool allowing you to record the entire screen or just a section. http://bit.ly/communityclipsdownload
Once you have installed the software. Search and click on the name to activate the program.


To start the program, go to the hidden icons on the bottom tool bar in the right hand corner. Click on the symbol with the question mark.


Selecting Start recording will record the entire desktop or select Start recording a region . To stop the recording go to the same place in the hidden icons. You can then save the video to your computer.

Jing

Camstudio

Camtasia - a commercial software which provides a screencasting tool and a video editior.

Professor Word

 
Professor Word provides a function which allows you to visit any web page, click on the word and a definition will pop up.
 
To activate it, you go to the Professor Word website and follow the instructions to add it to your favourites bar. You click on Run Professor word on the favourites bar and then go to a website and click on a word to see the definition.
 
This can be useful for students who are researching a topic or lower level readers and ESL students.

Add fun to learning with Trading Cards


This site allows you to create Trading Cards which gives students an alternative way to demonstrate their knowledge of a concept. This interactive activity allows students to create their own trading card about a real or fictional person, place, object, event or concept. The site also provides ideas and lesson plans.

Turn photos into art with these 3 apps


Popsicolor is a great photo editing app from the creator of Percolator. It turns your photos into an ink drawing using two colours. It is easy and fun to use. You can load images from your photo gallery on your device or take a photo.


This is another photo editing app which allows you to be creative with both images and videos. You can select from a range of tools to create artistic effects.


Repix provides you with a range of artistic effects which you apply straight to the image by drawing on the iPad.  This gives you freedom to add effects where you want.


Monday, June 17, 2013

A Guide to Digital Portfolios

Here is a one page guide to Digital Portfolios I created.


Sunday, May 05, 2013

Having fun with spelling


Here are two sites which can add variety and interest to spelling activities!


Create words using images from Flickr.  Great for writing names or adding interest to spelling words or creating banners to decorate Virtual Classrooms. Type in the word and click on spell.  To change the look of a letter click on it.  To save the image use can use the snipping tool on your lap top.


This is a great way to add some interest to spelling and integrate geography at the same time. You can type a message and the site finds an image from around the globe which resembles the letter.  You could do this as a class activity or send a message to someone.


7 Great sites for free images


There are many reasons why we use images in the classroom.  With the internet, we now have access to more images than we have before.  However, we need to be aware of which images we use and the copyright restrictions.
Here are a few sites which provide free images to use.  You still need to check the requirements before you use the image. 


Saturday, March 24, 2012

Creating Comics with Photoscape

Photoscape is a free software which you can download. This software has many uses but the one which I really like is the ability to create photo collages and add speech bubbles.
It would be interesting to hear how others would use this software. It is great for creating Digital Storytelling, comics, digital multimodal products and collages.

To create a comic click on 'Page'.
You can then select the size of the page and select the page template you wish.


Change the size by clicking on Edit, an A4 size is Width: 720 and Height 1040

You select the folder with images and click and drag the images into the collage.
To add the speech bubble, click on edit and then object. Customise the speech bubble.
You can then save the page as a jpeg file to your computer.


Creating Photo Collages can also be a great way to tell a story by choosing a theme or take photos of the same object from different angles.  I would love to hear ways you would you this software.

Wednesday, November 09, 2011

Embed into PowerPoint

I had to share this bit of information.  Yesterday a colleague of mine showed me how you can embed items into 2010 powerpoint.

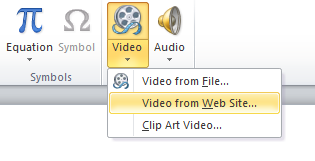
Go to insert, video and video from website

Copy the embed code from a website such as http://www.voki.com/


Paste in the Code


Select Insert and the embeded content will now appear in the PowerPoint.

For years Language teachers have been asking me how they can save their Vokis without having students sign in.  This is a great way for students to present work from the web.

Vokis in particular can be used for students to demonstrate understanding, reflecting, learning words and greetings, asking questions, responding and give instructions.

Sunday, July 17, 2011

Add interest with Glass Giant

There are some fun online sign generators available.  A great one to play with is Glass Giant.  You simply type in the message you want displayed and the site adds it to an image.  I like to use it to create images to use in presentations but you could also make images for work sheets, virtual classrooms or decorate your classroom walls.  Here are a few example.

Back to School


Keyboard Mods


Chocolate Bar


Rocket


Plane Banner

Thursday, June 30, 2011

Create Talking Images

This post is an extension of the last post I made where you can attach sounds or speech to shapes.  In this activity you can drawing shapes onto an image and then making the shapes transparent.  This idea was inspired by acolleaue of mine and her great site on using ICT in the Early Phase . 
Ways to apply to learning are:


• Describing the words in a tag cloud

• Describing aspects of an artwork

• Discuss aspects of a photo

• Add music to reflect the mood in an image

• Eye spy photos

To start insert an image into PowerPoint.  Draw a shape over an area of the image.  This can be done by selecting a shape or freeform shape.  Attach the sounds to the shapes as explained in the last post.


Now to make the shapes transparent,  right click the shape and select Foramt Shape.


Move the transparency bar to 100%


Select Line Color and select No Line and your shape will now be transparent.

 
Now you cannot see the shape on top of your image.  To test go to slideshow and move your mouse over the screen, when you click you should hear the sound.